


Many of us have played with radio-controlled cars. Increasingly, people have upgraded to radio-controlled helicopters and other flying objects, particularly the quadcopters like the Parrot AR.Drone. So, when the opportunity came up to get a respectably workable drone at a big discount, I jumped on it. This is the Micro Drone 2.0 from Extreme Fliers.
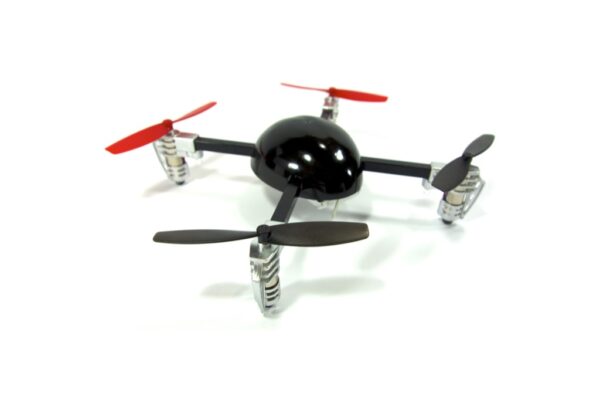
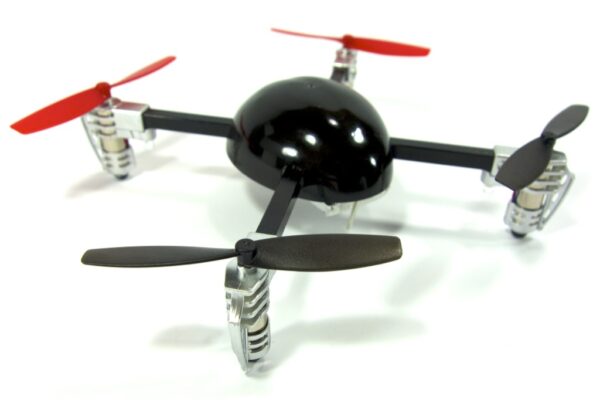
The Micro Drone 2.0 is really small. That’s why there’s the “micro” in its name. It is a quadcopter, so there are four rotors, one at each end of the X-frame which makes up its main chassis. The drone measures just 145 mm long from tip to tip across the X-frame, plus about another 20 mm at each end for the rotor that goes beyond the edge. It’s also awfully light, weighing about 36 g.
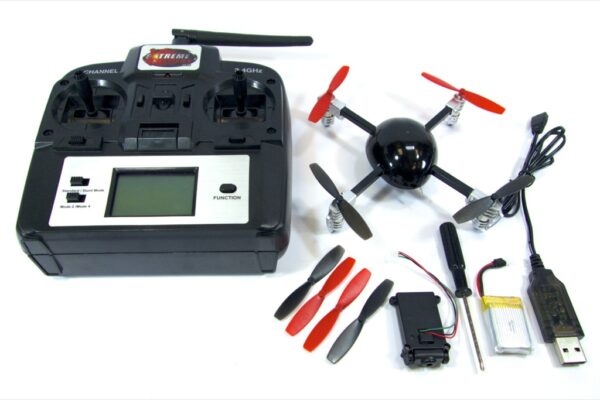
The Micro Drone 2.0 comes with a number of parts in its box. Aside from the drone and its 4-channel radio-controlled remote, there are:
- Small rechargeable battery (for the drone itself)
- USB charger (for charging the above battery)
- Complete set of spare rotors
- Small Philips-head screwdriver
- Camera module (mounting screws not pictured)
The main difference between this Micro Drone version 2.0 and its predecessor is that the new drone has an onboard camera port and comes with a camera module included.
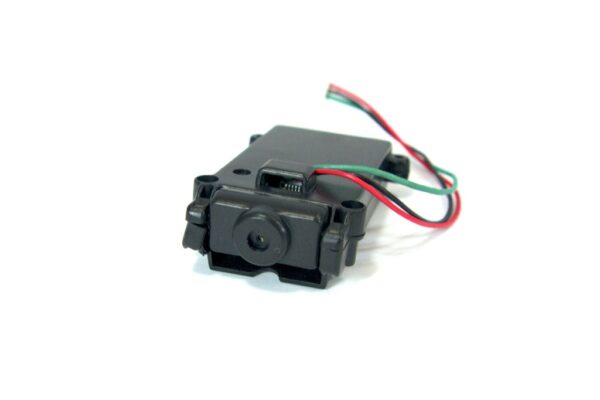
The camera module has a swivelling lens head that lets you adjust the vertical shooting angle. The camera module is mounted under the belly of the Micro Drone, and the cables need to be plugged into the Micro Drone’s onboard port, pictured below.
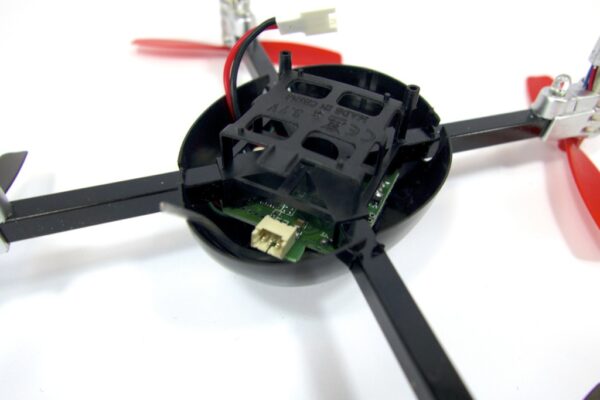
To get started, the battery needs to be mounted into the slot under the Micro Drone’s belly, and then connect the power cables together. There is no on-off switch. Connecting or disconnecting the cable switches on or off the power to the Micro Drone. Once powered on, LED lights under the rotors will turn on. The black rotors are the front, and they have white LED lights under them. The back rotors are red, and they have LEDs blinking red and blue alternately under them.
The remote radio-controller needs to be paired up with the drone. Set the drone down on a flat surface. Turn on the controller, push the throttle (left stick) from down all the way up, then back all the way down. The controller will beep. It’s then paired, and you can pretty much get started on your first flight.
The manual provided with the Micro Drone 2.0 is absolutely horrendous. It’s wrong in so many ways. Either that, or the people who assembled my Micro Drone 2.0 have royally messed up the wiring. I spent two hours trying to “debug” my Micro Drone.
- The manual describes two control modes. Mode 2 is where left and right movements on the left stick causes left and right roll (bank) respectively, while in Mode 4, left and right movements on the left stick causes counter-clockwise and clockwise turns respectively. It is completely opposite for my Micro Drone 2.0.
- The trim setup instructions are thoroughly confusing. Part of the instructions refer to clicking on the left or right trim, but another part instructs to click the trim to the left or right. The trim button can only be pushed (or clicked) to the left or right. You can’t click on the trim. Now, if you thought their instructions were simply ambiguous, and when they say “click the right trim”, they meant to click to the right, well no. The accompanying illustrations contradict the words.
- On the trim instructions again, the illustrations always point to the left side trim button for Mode 2 settings, and always point to the right side trim button for the Mode 4 settings. It’s just wrong.
- About the USB charger, the manual says the red light will indicate if the battery is charging (presumably, “on” means it is charging), and that once charging is completed, the red light will turn off. It’s the opposite for me. The red light is OFF when charging, and ON when charge is complete.
Extreme Fliers: You really need to fix your documentation. (Or do I somehow have a Micro Drone 2.0 with completely messed up wiring?)
The awful manual aside, the Micro Drone 2.0 works. It’s not so easy to fly as it looks in the videos. There’s quite a bit of learning curve trying to take off, hover, and land properly.
I’ve heard that in flying a real helicopter, one of the most difficult tasks is to simply hover still. Well, that’s pretty much the same with this drone. Even in an indoor environment, where there’s no wind, I can barely keep the drone hovering over the same spot.
Fortunately, the Micro Drone 2.0 is quite hardy. Despite several accidents, including dropping from height, landing sideways, and colliding with objects, the drone (touch wood) always comes out unblemished. It’s really well made.
The two control modes, which I mentioned in my complaint above about the manual, lets you choose which way you prefer to fly your drone. There is no right way or better way. I prefer Mode 2 (the manual calls it Mode 4), and this is where the right stick alone controls the tilt on all directions. This is how the controls on a real helicopter work. The left and right movements on the left stick then controls rotation.
I’ve not yet had the opportunity to try out the camera module. I’ll post an update when I do. One thing’s clear is that the camera is not weightless, so attaching it to the Micro Drone 2.0 will reduce flying time, which is already a relatively short 6 – 8 minutes on its own.
Conclusion
The Micro Drone 2.0 is a great level up from radio-controlled cars. There’s a bit of a flight training needed to properly handle a quadcopter, but this drone is a lot easier to manage than other flying objects. Quite importantly is the inclusion of a camera module, because after all, how much fun can you get with a drone that can’t do anything apart from just flying around. The camera is quite low resolution, but it’s better than nothing!
Pros:
- Very well built and hardy
- Advanced 4-channel radio-controller has trim controls and different control modes
- Has camera module
Cons:
- Instructions are really bad