


The first thing you need to decide on is what flying mode you want to use. You can choose between Mode 2 and Mode 4. The modes determine what the two control sticks on the remote control do. On the left stick, pushing forward or pulling backward always controls throttle (increase or decrease, respectively). On the right stick, pushing forward always flies forward and pulling backward always flies backward.
The mess is with what pushing left and right means for the left and right sticks. So, take a look at the following graphic.
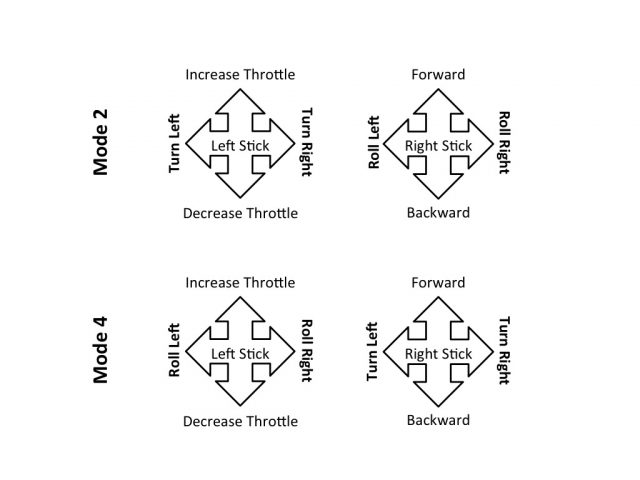

This is exactly how my Micro Drone behaves.
Once the modes are sorted out, now let’s work on the trimming functions. The forward trimming functions are correctly described by the manual. The trim button for forward/backward control is the right-side one between the two control sticks. If your drone drifts forward, click this button downward; if your drone drifts backward, click this button upward.
There are two more trim buttons: one under the left stick, and another under the right stick. The trim under the left stick controls drift of whatever the left/right action does on the left stick; and similarly the trim under the right stick controls drift of whatever the left/right action does on the right stick. What the left/right action is on the left and right stick, of course, depends on the Mode.
So, let’s look at the following table.
| Trim under left stick | Trim under right stick | ||
|---|---|---|---|
| Mode 2 | If drone drifts left: | Click this button to the right. | |
| If drone drifts right: | Click this button to the left. | ||
| If drone turns counter-clockwise: | Click this button to the right. | ||
| If drone turns clockwise: | Click this button to the left. | ||
| Mode 4 | If drone drifts left: | Click this button to the right. | |
| If drone drifts right: | Click this button to the left. | ||
| If drone turns counter-clockwise: | Click this button to the right. | ||
| If drone turns clockwise: | Click this button to the left. |
There, the trim should now be properly sorted out.
Another bit of oddness is about the USB charger’s indicator light. The light is ON when either:
- There’s no battery connected to it.
- If there’s a battery connected to it, then it is fully charged.
The light is OFF when it is still charging a connected battery.
Once you’ve these things sorted out, the Micro Drone 2.0 isn’t too difficult to fly. Sure there is definitely some learning curve. Also, unlike a flight simulator you could experiments for hours at once, this drone flies only for about 6 minutes before your training session needs to take a mandatory break (to recharge the batteries). But it’s not too difficult. Just find a nice big space, with little or no wind if you’re going outside.
I hope this page helps you out. Again, this is how it works for my Micro Drone 2.0. It’s possible that I may somehow have a Micro Drone 2.0 that has been incorrectly assembled, but it seems that there are others reporting the same problems. If you have trouble making sense out of your manual with your Micro Drone 2.0, perhaps this page will be helpful.
(This is written in Jan 2014, with the manual I received in Dec 2013. Hopefully Extreme Fliers correct their manual in future shipments.)