 Since the haze reached record breaking levels in June 2013, and with Singapore’s official PSI readings always giving a rather useless rolling past average values, I decided I needed to get my own haze sensor. The sensor took a couple of weeks to arrive, and by then, the urgency to have my own haze readings became diminished. I did build what I had set out to do, but not quite in the most elegant way.
The haze is already back this year. Very early, in fact. So the haze sensor project got restarted again. The idea I had for a proper implementation was for the entire sensor gadget to be self-contained, which means that I need not attach it to a computer.
Last year, my quick build basically depended on connecting the sensor, which is actually the Shinyei PPD42NS particle sensor, to an Arduino board. The Arduino board will give me the ability to measure the low-pulse occupancy used by the particle sensor to report the particulate level. The Arduino board, in turn, was connected to my Linux PC, so that I can retrieve the reading, record, plot, and do whatever else I needed with it. The Linux PC was part of the haze sensor. It was clunky.
The better implementation is to replace the Linux PC with a Raspberry Pi. Furthermore, it would be more elegant for the Raspberry Pi to communicate with the Arduino using I2C, rather than USB. That’s what I’ve done this year.

The Raspberry Pi has a USB Wi-Fi dongle, so it can communicate with the Internet wirelessly. The only thing that’s not wireless is, of course, that power still needs to be supplied.
Power turns out to be a rather troublesome problem too. I found it was not entirely a trivial matter to keep the Shinyei PD442NS particle sensor sufficiently powered enough to produce a reliable data reading. With too little power, the sensor still seems to work, but it appears to have artificially inflated readings.
After trying various powering options, I’ve currently settled on powering the Raspberry Pi and the Arduino independently, each with its own micro USB cable from a suitably powered USB wall adapter. I’m planning to get a micro USB Y-split cable, so that there only needs to be one USB port needed on the power supply end. Hopefully a single USB port will be capable of supplying power to both the Raspberry Pi and Arduino. It should.
I want to elaborate a little on this particle sensor, or dust sensor, in relation to keeping tabs on our haze situation. As you know, our National Environment Agency reports on PSI values, which historically had excluded particle sizes under 2.5 microns. This will change from 1st May 2014, where the PSI computation will take into account this category of fine particles. PSI, fundamentally, is an index that attempts to measure the pollutant level of several types of air pollutants.
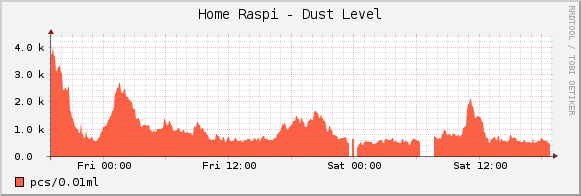
The Shinyei PD442NS particle sensor is a lot more straightforward. It simply measure the level of particle concentration in the air. The “information” you get out of the sensor (after processing its raw low-pulse occupancy time data) is the number of particles per 0.01 cubic foot, or particles per 283ml. This Shinyei sensor I’m using measures particles as small as 1 micron.
It’s a whole lot different from PSI. You cannot “convert” its values to PSI equivalents. They just aren’t the same thing.
Nevertheless, that doesn’t prevent one from using it as an indication of the air quality level. It does tell you the concentration of particles, after all. This is pretty much what we’re concerned about when we talk about the haze resulting from burning.
I’ll post another time more details about building this sensor.
Wow, sounds like you’ve got a really interesting and useful project going, Zit Seng. I heard the haze has started already, and it’s not even April yet. 2 streams of thoughts happening here: 1 – this project has potential, to challenge some students? 2 – Keeping the haze down at home, as the air-cleaners with HEPA filters will only remove the particulate material down to a certain size. Unless your have activated charcoal scrubbers, a lot of the potentially toxic fumes from the burning forests will persist in the air….. Living plants can srcub the air but requires time, moisture and sunshine…
Hi, that’s a nice setup. Could you share your sources on Github ?
That’s a wonderful setup! May I know whether you use a fan or not to direct the ambient air into the sensor’s chamber? I am currently building a similar setup like yours, but I am using SHARP GP2Y1010AU0F dust sensor instead. I’m not sure wether I need to put a fan or not to direct the air into the sensor’s chamber. Any help will be much appreciated!
No I did not use any fan. Just merely ensured that ambient air could reach the sensor unhindered. Adding a fan seems to inflate the sensor readings.
Hi, can you offer your code? I’m a beginner and want to try this sensor as well. In need an example how to get data out of the sensor and how connect it so the raspberry.
Where did you get your sensor from?
Oo, it’s been a while, I don’t quite remember. I think it could have been Seedstudio.