
I frequently talk about IT security. It’s time to practice what I preach. Since two weekends ago, 22nd March, this blog website has gone entirely on HTTPS. Accesses via HTTP is redirected to HTTPS. The HTTP port is still open, so people who have bookmarked the old URL can still access this blog, but HSTS ensures subsequent accesses are automatically converted to HTTPS only.
HSTS, or HTTP Strict Transport Security, is a web security mechanism that informs web browsers, including other HTTP user agents, that they should interact with a website using only HTTPS connections. Even if the user types a HTTP URL, or clicks on a link that specifies HTTP, the HSTS policy sent by the web server tells the web browser to convert that into a HTTPS connection.
For a public website, this is the better solution, instead of simply cutting off HTTP completely.
SSL certificates, which you need to get to use HTTPS, are getting much cheaper to obtain nowadays. For many years, you could buy SSL certificates for about US$10, or less, a far cry from the early days when they could cost over US$100.
Nowadays, you don’t even need to pay for SSL certificates, if you absolutely are on a budget and don’t want to spend a cent on them. One certificate provider that I’ve been using for some time is StartCom Certificate Authority. They provide annual SSL server certificates free-of-charge. They also provide SSL email certificates, which are used for email security instead of on websites. These certificates do have to be renewed on a yearly basis. There is no option to get a multi-year certificate at one go.
There’s also another effort to bring SSL certificates to everyone for free. This is the Let’s Encrypt certificate authority, and it’s backed by bigwig names like Cisco, Mozilla and the EFF. It’s still in the pipeline though, and their free, automated, and open certificates are targeted to arrive in mid-2015.
As part of a website upgrade, I’ve also moved from a shared hosting server to a cloud virtual machine instance. I’ve been quite pleased with DreamHost, where my website has been hosted. Last year, they started to offer a new server, DreamCompute, which is essentially a cloud computing service built on OpenStack. I’m familiar with OpenStack, to some extent, because I’ve that deployed at my day job too.
DreamCompute is reasonably cheap. For US$5 a month, you get a tenant quota of 2GB of RAM, 25GB of block storage, 2 compute instances and 1 fixed IPv4 address. You can fire up 2 compute instances and divide up your resource quota between them, or you can give all the resources to a single compute instance. It’s actually quite cheap, comparing with other providers like AWS or DigitalOcean. Network transfers are not measured at this time, meaning that they are free, and I hope it stays that way. There are higher-end plans, with more resource quotas. The entry-level one is really awesome, because if you think about the fixed IPv4 address provided, sometimes just that alone could cost US$5/month at other places.
You also get public IPv6 access with all DreamCompute compute instances. The IPv6 address is fixed to the compute instance, and as long as you don’t terminate them (rebooting and suspending/resuming them is fine), that IPv6 address is always there. IPv6 addresses are plentiful, so it shouldn’t be necessary to ration them anyway.
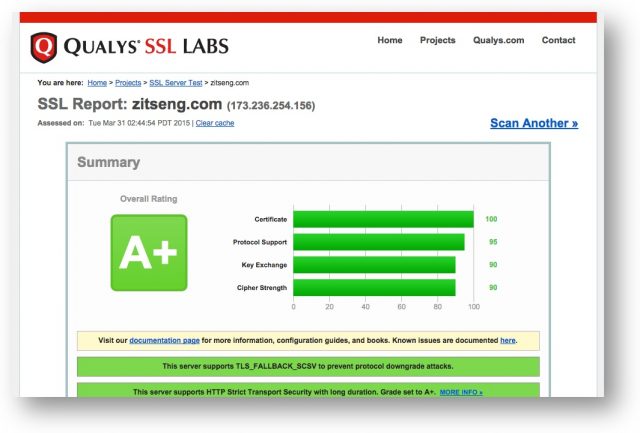
With the ZitSeng.com website running on my own cloud instance, I now have the flexibility to set up the LAMP stack the way I want. In particular, I can directly configure Apache to me needs. For example, SSL configuration tuned to score A+ with a 100/95/90/90 score on Qualys SSL Labs SSL Server Test.
Once upon a time, I used to own a server which was co-located in a data centre. Now I’ve sort of come around one circle to owning a server again, albeit this time it’s entirely virtual. I’ve chosen to go with a CentOS 7.0 instance, since that is the most current version of an enterprise Linux distribution. This is essentially RHEL7 (Red Hat Enterprise Linux 7), where many things have changed from RHEL6. There’s a bit of learning curve for sysadmins to adapt to new stuffs like systemd.
Fortunately, I’m already using CentOS 7.0 at home and at work, so this new setup isn’t unfamiliar to me.
At another time, I’ll share a simple tutorial on setting up a CentOS 7.0 instance, configuring LAMP, and installing WordPress. Nothing difficult, but people who have only used shared web-hosting where everything is managed through Cpanel or the likes, moving to a virtual machine instance will definitely involve learning a couple of new things.
Go with Nginx/php-fpm/MariaDB instead. If you are adventurous can use HHVM then fallback to php-fpm.
Yup, CentOS 7 already uses mariadb. Let’s see, php-frpm is in the repo. Nginx seems to need custom repo. Maybe will think about them a bit later. 🙂
Remember to change your DB engine to Aria!
Oo, thanks. I didn’t know about mariadb’s new developments! 😛