I’ve had to setup/re-setup a few of my Windows 10 recently. There are quite a number of things I need as a UNIX/techie kind of user, and while I’ve written about my setup previously, they are scattered in bits and pieces. Some have gotten outdated too. Hence, it’s timely for a 2021 consolidated update.
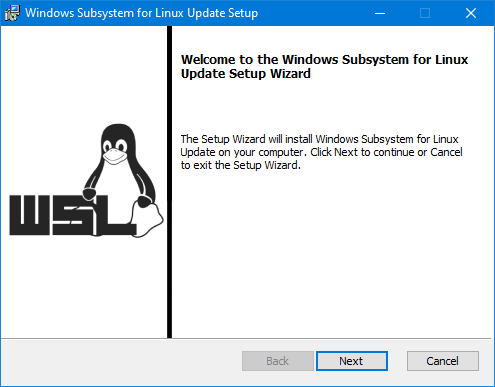
The first thing to do is the Windows Subsystem for Linux (WSL) setup. My original WSL post is largely still accurate, though with Microsoft’s latest Windows Subsystem for Linux 2 (WSL2), one extra install step (or two) is now needed.
The quickest way to get WSL is to install via PowerShell.. Run PowerShell with administrator privileges. (Press Win+X, then A.) Click Yes in the UAC dialog box. In the PowerShell window, type:
Enable-WindowsOptionalFeature -Online -FeatureName Microsoft-Windows-Subsystem-LinuxReboot your computer if prompted to. Then go to the Microsoft Store app, search for Ubuntu, and install that.

Pick whichever you fancy. Just plain “Ubuntu” will also get you Ubuntu 20.04 LTS, no need to specifically choose the 20.04 version. Then, run the “Ubuntu” app.
This brings up a text console window with some text about Ubuntu being installed. It’ll take just a few moments, then you’ll be asked to create a user account.
I want WSL2 which at this time requires a separate step to install a Linux kernel. Grab it from aka.ms/wsl2kernel and install.
After that, open a CMD window and do two things: convert the existing installed Ubuntu to WSL2, and make WSL2 the future default:
wsl --set-version Ubuntu 2
wsl --set-default-version 2
The next thing is a simple configuration for WSL2 to support filesystem metadata from the Windows side, and while we’re at it, mount the Windows drives somewhere different from /mnt (my preference). Edit the /etc/wsl.conf file inside WSL2:
[automount]
enabled = true
root = /windir/
options = "metadata,umask=22,fmask=11"
mountFsTab = false
You can either reboot, or just kill WSL2 by running from CMD below before starting it up again:
wsl --terminate UbuntuThat’s all for WSL2.
Next, I love the PowerToys tools. Grab it from GitHub – microsoft/PowerToys: Windows system utilities to maximize productivity, and just install. It does a couple of useful stuffs, like the PowerToys Run which is sort of like macOS’ Spotlight/launcher. If it fancies you, configure PowerToys to run in administrator mode.
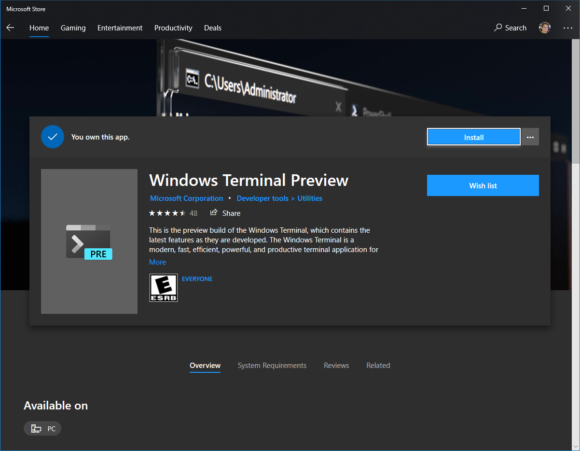
The new Microsoft Windows Terminal is quite cool, a modern refresh of the rather stale default CMD console you get out-of-the-box. You can get this from the Microsoft Store. I like to go with the preview version, Windows Terminal Preview.
I use git and GitHub, and like to have a simple, transparent, method to manage git credentials. For that purpose, I had been using Git Credential Manager for Windows. Sadly, this project is “archived”, and superseded by Git Credential Manager Core. Unfortunately, you can’t just use that standalone, because you need Git for Windows, which since version 2.28 includes GCM Core. Hence, just go install Git for Windows. All the defaults are fine, no need to think too much about the various configuration options.
In your WSL2 shell, configure git like so:
git config --global credential.helper "/mnt/c/Program\ Files/Git/mingw64/libexec/git-core/git-credential-manager-core.exe"I typically sign my git commits, and setting that up is no different from a conventional UNIX environment. Just put something like the below in your ~/.gitconfig:
[user]
        email = lzs@zitseng.com
        name = Lai Zit Seng
        signingkey = ...
[commit]
        gpgsign = true
[gpg]
        program = gpg2
Make sure you have gnupg installed.
Many developers on Windows platform will be familiar with Visual Studio Code. Even for someone who often just simply only needs a bash shell, I sometimes use VS Code too. Installation itself is straightforward. Then, install the Remote-SSH and WSL extensions.
One thing that annoys me is how the SSH used in VS Code, by default, is not the one used in WSL2, and hence won’t use its keys and configuration. There’s a way to fix it, as per my original post about Remote-SSH in VS Code.
Here’s what to do. Create a batch file “ssh.bat” and it put in, say, C:\Users\<username>\bin with this single line:
C:\Windows\system32\wsl.exe ssh %*Then, in VS Code settings, set remote.ssh.path to:
C:\Users\<username>\bin\ssh.batThat’s it.
View Comment Policy