This is a little collection of information about using Mac computers in NUS (and SoC). Macs work pretty well here, as long as you know how to get it configured correctly. There are four main topic areas covered here:
- Wireless Network
- Exchange Email
- Network Printing (particularly for printing to SoC printers, updated to include Lion and Mountain Lion support)
- Network Drives (NUSNET H: drive or SoC UNIX server)
That should be pretty much the main things you’ll need to know. There are some additional topics covered in Part 2 so that this page will not become too cluttered. If you’re looking to use the Mac for programming, check out Setting Up Your Mac For Programming.
Wireless Network
The first thing is to get onto the network. Nothing works without the network.
The official wireless network you should use is the one that goes by the SSID of NUS. You can also use eduroam if you see it, but it’s primarily meant for users who are roaming to NUS from other participating educational institutions. If you use NUSOPEN, don’t use it, it’s an insecure legacy network that should be pretty much extinct by now.
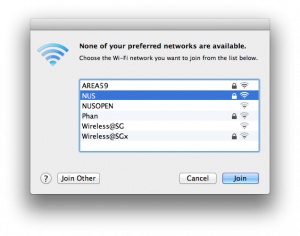
- If you’re lucky, when you open up your Mac inside the NUS wireless coverage area, you will automatically be offered to join the NUS SSID wireless network. If you see a window pop up like below, click on NUS, then click Join.
- If not, click on the wireless icon in the menu bar, and look for NUS listed in the available networks. Click on NUS. If NUS is still not listed, look further below for manual configuration instructions.

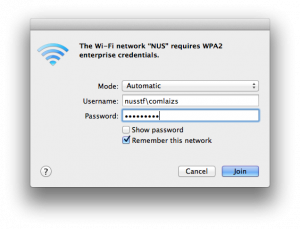
- You will be asked to enter your credentials. Leave the Mode at Automatic, and enter your NUSNET userid and password in the Username and Password boxes. Remember that your NUSNET username must be in <domain>\<userid> format (i.e. nusstf\xxxxxxxx for staff, nusstu\xxxxxxxx for students, etc).
- You’re done.
- Start System Preferences.
 Click on Network (under Internet & Network).
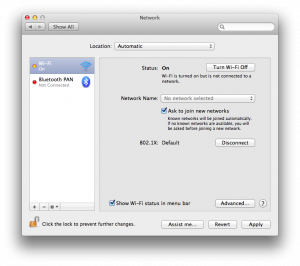
- On the left panel, click on Wi-Fi (or AirPort), and then click on Advanced.
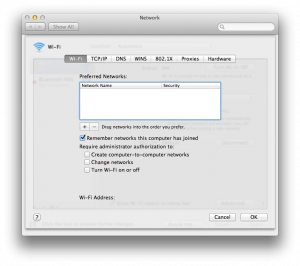
- Click on the + sign.
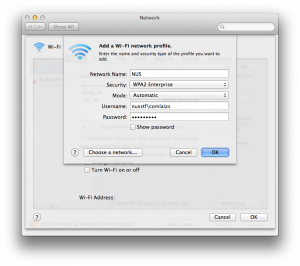
- For the Network Name, enter NUS.
- For Security, select WPA2 Enterprise.
- Enter your NUSNET username and password in the Username and Password boxes. Remember that your NUSNET username should be in <domain>\<userid> format (nusstf\xxxxxxxx for staff, nusstu\xxxxxxxx for students, etc).
- Click Ok.
- The new NUS configuration will now be listed in the Preferred Networks list. If you have other wireless network configured, you can drag the NUS item to prioritize which network your Mac will use when multiple wireless networks are detected.
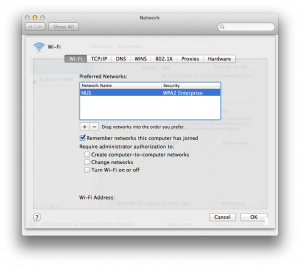
- Click OK.
- Click Apply. Quit System Preferences.
- You’re done.
This is a Mac guide. But if you’ve a N95 or N95 8GB, configuration information is available here. The information will probably be useful for most modern Symbian based phones (Nokia, Sony Ericsson, etc). iPhone users can refer to Lester Chan’s guide. For Linux Users, you should pretty much know how to self-support.
Exchange Email
Here’s how to access your NUSNET Exchange email from Mac OS X’s Mail application. (This assumes Mac OS X 10.6 Snow Leopard which supports Exchange 2007. If you have an older Mac OS X, please refer to Exchange Mail with Leopard.)
- Start the Mail application.
- Press Command-comma.
- Press the + sign.
 Type in your Full Name, NUSNET account userid and password. The NUSNET account userid should be in xxx@nus.edu.sg format. Note that the xxx must be your real NUSNET account userid, not the nice email address that you can choose. (E.g. I must use comlaizs@nus.edu.sg, not lzs@nus.edu.sg in this Email Address box.)
- Click Continue.
 Everything is auto-configured with Exchange 2007, so you go straight into the Account Summary screen. Choose to also select Address Book contacts and iCal calendars, if you want integration with the Exchange contacts and calendar. Click Create.
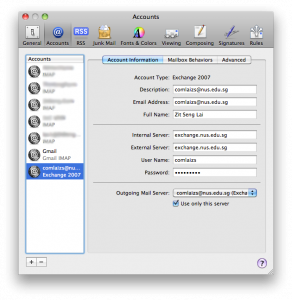 Back in the Accounts window, you can edit the new account settings if needed. For example, you might want to change the Description and Email Address. At this point, you can put the “FriendlyMail” email address which you have selected into the Email Address field. When you are done, just close the window. If you made changes, you will be prompted to save the changes.
You’re done. The Mail application should now connect to your Exchange account, grab the list of folders, synchronize email, etc. If you had chosen to, you will find the Exchange directory and calendar accessible in the Mac’s Address Book and iCal applications too.
Printing
Here’s how to configure printing on Mac OS X to use the printers/print queues in SoC.
- Start System Preferences.
- Click on Print & Fax.
 Click the + sign.
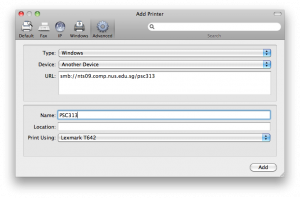 If there is no Advanced button in the toolbar, you may have to add it there before continuing. Right-click the toolbar (or Control-Click), then drag and drop the Advanced button to the toolbar.
- For Type, select Windows.
- The URL is the complicated bit. Make sure you get this right. The URL has the following format: smb://<nusnetid>:<password>@nusstu/nts27.comp.nus.edu.sg/<printername>
- where <nusnetid> is your NUSNET account name
- <password> is your NUSNET account password
- change nts27 to nts09 for staff users
- <printername> is the queue name of the printer which you can find listed at SoC Printers and Print Queues.
- For Name, enter anything you fancy to help you remember what print queue this is.
- Same for Location, whatever you fancy.
- For Print Using box, choose either the Generic PostScript Printer driver, or select the specific printer driver for the print queue. You can find the list of printer types at SoC Printers and Print Queues.
- Click Add.
 Usually fine to leave the option settings unchanged.
- Click Continue.
That’s it. The first time you print, you will be asked to enter your account credentials. You can elect to save the credentials into the Keychain so that you don’t have to keep entering it in future.
Printing from Mac OS X Lion and Mountain Lion works too. But the steps are quite different. At this point, there seems to be no way to configure through the usual GUI. But it’s not too bad… you configure via a web-based system instead. Before going on, make sure you’ve got the Lexmark Print Drivers from Apple if you don’t already have them, and make sure you run Software Update too, just to make sure that everything’s up-to-date. Then, go ahead to start configuring your print queue:
- Point your web browser to http://localhost:631/.
- Click on Administration from the navigation tabs at the top.
- Click on Add Printer.
- If requested, authenticate with your Mac’s administrator account.
- Select “Windows printer via spoolss”. Then click Continue.
- In the Connection box, enter the following string:
smb://DOMAIN;USERNAME:PASSWORD@SERVER/PRINTQUEUE
Replacing DOMAIN with your NUSNET domain (NUSSTF or NUSSTU), USERNAME with your NUSNET username, PASSWORD with your NUSNET password, SERVER with nts09.comp.nus.edu.sg (for staff) or nts27.comp.nus.edu.sg (for students), and PRINTQUEUE with the name of the print queue. Then click Continue. - Set any name you like in the Name field to help you remember what queue this is. Same for the Description and Location fields.
- Select the printer manufacturer in the Make field. Then, select the printer model.
- Click on Add Printer.
Done. Sounds scary but it works.
If you want to get a list of available printers, run this from the command line:
$ smbutil view //nts27.comp.nus.edu.sg/
Note: Watch out for special characters in your password. It might not go well with the smb connect string above. If you still have trouble connecting to the printer, try changing your password and keep special characters to a minimum. Obviously, ‘:’, ‘;’, and ‘@’ are not going to work since they are already used as delimiters in the string.
Network Drives
NUSNET provides one network drive, often referred to as the H: drive in Windows. SoC users also get another network drive from their SoC UNIX account. To access these drives from your Mac:
- Go to Finder, press Command-K.
 For the Server Address, enter the following: smb://nts09.comp.nus.edu.sg/com/comlaizs. This is the format for SoC staff users. For students, this is something like smb://fs5.nus.edu.sg/stuhome/u0x/u0x0xxxx.
- Just click Connect.
 You will be prompted for authentication. Entier your NUSNET account username and password here.
- Then click Connect.
 You’ll see your network drive in Finder.
The Server Address for your NUSNET network drive tend to be varied, depending on whether you are staff or student, staff of which faculty, student undergrad or postgrad, etc. If you have more information to share, I’d be glad to update this page. You can also login to a Windows machine (and into your NUSNET account), and check how the H: drive is mapped using the NET USE command.
The Server Address format for SoC users, to access their Unix home directory on sunfire or suna, take the following format: smb://sunfire.comp.nus.edu.sg/<userid> (for students) and smb://suna.comp.nus.edu.sg/<userid> (for staff). You can also check out Browsing SSH/SFTP Servers Like SMB Network Shares for alternative ways to access your Unix home directories.
Other Stuffs
Here’s a bunch of other miscellaneous information that you may find useful.
- NUS Dialup (you gotta be kidding right?!):
- 6557-1070 for students
- 6657-1090 for staff
SoC Dialup:(already obsoleted)1800-7761022 toll-free for both SoC staff and students
- NUS VPN:
- The older Cisco VPN based on IPSEC protocol is deprecated. Best not to use it.
- The newer Web VPN: http://webvpn.nus.edu.sg/
- SoC-VPN:
- Head over to https://webvpn.comp.nus.edu.sg/.
That’s it.
very useful guide indeed.
Do you know how do we access to the H: of the nusnet network drive?
Can you email me for the afp or smb address… thanks =)
Ok, I’ve updated the info on this page. I’m not sure if it is right… but give it a try. 🙂
hey zit seng,
thanks for the info. i’m a nus student using mac too, and found yr guide most useful.
just 1 question: how do i print duplex copies of a file? i know i have to check ‘duplex unit’ in the installable options, but when my printer at home is added automatically via USB connection, the installable options pop-up doesn’t appear, and i can’t seem to find it.
would be most grateful for yr help!
hey just wanna noe if i am able to send my print job from my macbook to a printer in computing centre or central library… i am from fac of eng cant soc is like quite far away haha..
try the pdf over here http://www.macnus.com/tech-support/
Just wanted to say THANKS because this guide is really useful (:
As an undergraduate matriculating in August this year, I just wanted to say thanks for all of the helpful info on this site. NUS’ documentation regarding OS X is decidedly hopeless, so it was good to find another online resource to allay my IT worries.
hey, will it be possible to download softwares like adobe creative suite from the nus server?
hey,
found your site very useful in helping me set up. Just wanted to check: the nus mail is a POP account. Therefore I would not be able to keep it online right? Is there an IMAP option?
It is actually an IMAP4 account. I don’t think POP3 is actually supported? The above instructions are for IMAP.
Thank you very much for writing such an easy to use guide. You make my life at NUS much easier.
Thanks so much for the information. It is extremely useful.
how do i connect to LAN port using NUSNET in school?
Hi,
I used to be able to print pdf files from my Mac without much problems at the central library.
Recently, when I try to print my readings, which let’s say is 10 pages, it appears to be hundred over pages at the printing counter (the place where we insert cashcard and pay for our printing). You have any idea why that might be so?
It’s really affecting me because I print a lot of readings form my laptop. Hope you can help on this. Thanks!
hey zit seng, i’m a nus student who’s a new mac user and thanks so much for your info on setting up our mail on Mac! it’s useful! thanks! =D
hi zit seng, do you have a guide on how to connect to the printers in central library and not just SoC? that would be helpful. thanks!
Unfortunately not… perhaps someone around here could help. 🙂
Hey zit seng! This is really useful! Thank you so much for it! I set up my email account in the shortest amount of time!
Hi,
Found your website really useful.
Just wondering about something – the “Outlook Web Access Server” did not show up if I chose the account type “Exchange 2007” but it did when I chose “Exchange IMAP”. So I was wondering did I miss anything in the configuration steps. I am using Snow Leopard.
By the way, have you gotten your WebVPN to work with Snow Leopard yet?
Gordon
Thanks. I’ve changed the text to read Exchange IMAP, but I won’t be updating the screenshot. I wrote the above during the time of Leopard, there was no Exchange 2007 support then.
With regards to WebVPN… I didn’t work when I tested shortly after upgrading to Snow Leopard. I haven’t tried since, partly because I don’t normally need to use it anyway.
Hi Gordon,
WebVPN is now working on Snow Leopard for me. It is quite simple, basically you just need to run the following command under Terminal:
sudo mkdir ‘/Applications/Network Connect.app/Contents/Frameworks’
I got the information from http://www.reddit.com/r/apple/comments/9f2oo/
whos_running_snow_leopard_now_what_do_you_guys/c0cjdd5
cheers,
Budiman
has anyone else gotten VPN to work with Snow Leopard? Does Budiman’s trick work?
Yes my VPN works fine with SL. Just follow the information by Budiman. It is quite a common issue, go google.
Hi Zit Seng! Thanks so much for this page. I was nervous bout getting a new Mac but this set it up fine.
Do you know how to get this working off-campus? I can receive mails under these settings but I can’t send anything. It says the smtp server is offline. 🙁
Off campus like where? There are some free networks (Wireless@SG included) that transparently redirect port 25 traffic, which will cause problems when you configure to use NUS outgoing server.
Oh, like in another country. Or just anywhere with a private internet connection as opposed to the school, or wireless@sg. 🙂
Do you know if it’s ok on a normal broadband isp connection (e.g. StarHub MaxOnline, SingTel ADSL, or any of the 3G broadband data)? I used a few of them and they’re ok for me. I believe the likely cause of the problem you face is what I mentioned earlier: some networks transparently redirect port 25 to their own SMTP mail server, or perhaps they might even block entirely. There are ways to troubleshoot and identify the cause, but a little too longwinded to describe in here. 🙂 We can discuss separately if you want.
Oh, I see. That’s okay since I’m back in Singapore now..for the time being. I really appreciate your help, though. Thanks so much.
Thank you for all the useful information. In five years at NUS, I’ve learned everything I know about using macs on campus from you.
Hi Zit Seng,
I have the same problem as Annie and I’m interested to in finding out how to trouble shoot. I can’t send my emails out as well. It said the smtp server is offline. How do I resolve this issue?
Heh. Ok, can we move the “support” to Answers@Comp (http://answers.comp.nus.edu.sg/). It is a user support community setup run by some of SoC student helpers. I can follow-up in there too.
Hi Zit Seng,
I have the same problem as Annie whereby I can receive incoming emails but I can’t seem to send out any emails through my nus account. My smtp server is offline also.
I would like to know how I can troubleshoot this problem. Can help??
Hi Glen,
Let’s go over to http://answers.comp.nus.edu.sg/ to follow-up. Thanks.
Hi Zit Seng
I am having the same problem with outgoing emails from my nus accont when using mac mail app. Tried going to the link you gave but couldn’t find anything there. Would you be so kind as to explain how to solve the problem/ direct me to the thread where this was discussed?
Thank you!
Regards
Patricia
Hi Patricia… just head over to the Answers.comp.nus.edu.sg and post your query/follow-up there. Others can chip in to help too, not just me. (I’m trying not to turn this page into a forum…)
Hi Zit Seng,
Thanks for all the things you’ve put up. Is there a way to connect a time capsule to NUS SSID?
To NUSOPEN SSID I have no problems connecting it.
But I can’t figure out a way to connect it to NUS SSID. Is that because it requires some password?
Hope you can help.
Sorry, I don’t know… no Time Capsule to play with 🙂
ok thanks.
Hi,
I just purchase a mac and I realize the new mail client doesn’t allow you to manually set up mail anymore,
it basically just prompts me for my email address and password, after which it automatically search and detects the nus mail and set it up as an exchange 2007 acc type.
Any idea?
Hi gy, thanks for pointing out. It turns out that NUS now has Exchange 2007! It makes configuration so much simpler and now we get directory and calendar integration too! I’ve updated this page to reflect the new configuration.
Heya.. Thanks for the wonderful information! 😉
However, is the link https://www1.comp.nus.edu.sg/cf/printing/printers.html still valid? It seems that the page doesn’t load. Thanks! 🙂
Cheers!
Hmm ok will update the new link.
hey! thanks for all the information! i’m just wondering if it’s possible that my account type for my mac mail be IMAP instead of Exchange 2007. previously, there was an option for me to choose the account type when i created my nus mail. i’d really like it to be IMAP instead of Exchange 2007. pls advice 🙂 thanks!
Hi!
Thanks so much for the site and info!
But is there any methods of connecting to SDE (School of Design and Environment) network printers?
Please assist! 🙂
Many thanks!
Regards,
Samuel
Afraid I can’t help much with SDE specific configuration. How is it done for Windows users?
Hi Zit Seng, were you able to print in Lion? I upgraded to Lion and could not print thereafter. The print job is stuck at “Connecting to printer…” which takes forever until the printer is paused by itself.
Not working for me either, unfortunately.
Hi, after following these steps my airport status keeps saying ” airport does not have an ip
Address and cannot connect to the Internet. Please help!
It has associated with NUS? Where is this happening?