Ten years ago, or even five years ago, using a Mac in NUS may prove to be a bit of a challenge. Things are quite different these days, and its not just because the Macs have become so commonplace, but the recognition of diverse platforms, including Android and iOS phones and tablets, that need to be supported.
If you need to ask, well, the short answer is that the Mac is very much at home in NUS. Most Mac users find that everything just works. The basics, like Wi-Fi, email, printing and VPN, they all work.
This guide is not about helping you decide if you should get a Mac. That’s a surprisingly difficult question to answer, because it depends on what you want to do on your computer, and also what you’d be asked to to do on your computer because of the modules that you take in NUS.
However, if you already have a Mac, or have decided to get a Mac, this guide will show you around, and hopefully get you working productively with your Mac in NUS.
The Basics
To connect to NUS Wi-Fi, just click on the wireless icon in the Mac’s status menu, then choose the NUS. OS X will automatically figure out that WPA2 Enterprise wireless setup is required, and prompt you for your Username and Password. Make sure to enter your NUS username (e.g. NUSSTU\xxxxxxxx, for students) and password here.
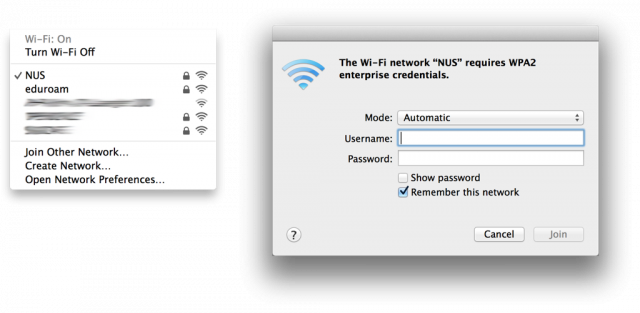
The domain prefix, i.e. NUSSTU, isn’t actually needed above, but entering it is just fine too. However, some NUS websites and apps do require the domain prefix, so instead of trying to remember when or not you have to enter the domain prefix, I suggest to simply enter it whenever in doubt.
Setting up Exchange email on the Mac is simple. Launch the Mac’s Mail app. If it has not been setup before, Mail will automatically ask you to add a new account. Otherwise, just go to Preferences (Cmd-,), select the accounts tab, then click on the + sign at the bottom to add a new account. Next, choose the Exchange account type, then enter your Name, NUS email address (e.g., xxxxxxxx@u.nus.edu) and password. The Mail app will figure out the rest of the email settings automatically.
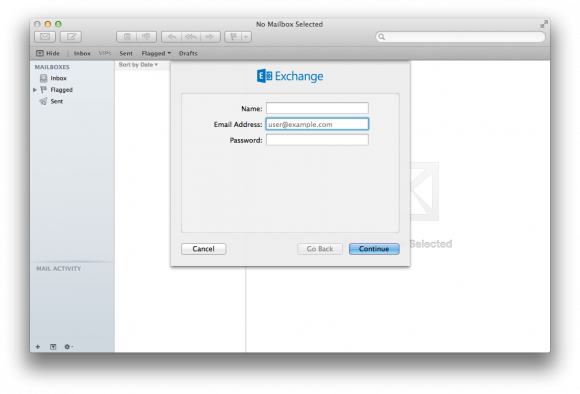
The Mail app can also sync contacts and calendar with Exchange too, if you let it do. Check the appropriate boxes before you click Done to finish up the account setup.
(I personally prefer Airmail for my emailing needs. It’s a really beautiful, streamlined, mail app. It costs S$12.98 from the App Store, although you can get beta/development copies free of charge.)
NUS WebVPN supports the Mac. You could just hit https://webvpn.nus.edu.sg/ with your favourite web browser, but with often broken Java support and Chrome also starting to disable Java plugins, you’d be better off installing the Junos Pulse client. A PDF guide will give you further instructions. Junos Pulse is also available on Android and iOS, just search on their respective app stores.
School of Computing (SoC) has their own WebVPN at https://webvpn.comp.nus.edu.sg/. Due to similar Chrome problems, you are better off launching the FortiClient software directly. It’s installed anyway as part of the WebVPN setup. You can also find FortiClient on the Android and iOS app stores.
Printing setup instructions can be found at ComCen’s eGuides: Student Printing for Mac OS. Check the eGuides for other useful information. OS X also includes support for direct printing to PDF without any additional software, so you don’t need to install Adobe Acrobat.
For SoC users wanting to print to SoC printers, you may refer to the instructions in this page under Printing section.
Running Windows
Webcast, used to stream your lecture video recordings, works on the Mac. The main learning portal, IVLE (Integrated Virtual Learning Environment), works on the Mac. Most web-based apps will work just fine on the Mac.
The bad news is that we cannot discount the possibility that Windows will be needed somewhere sooner or later, for some reason or other. It could be that a module you take that mandates the use of a certain app that runs only in Windows. The simple solution here is to turn to virtualisation solutions such as VMware or Parallels.
An alternative is Boot Camp, which basically sets up your Mac to dual boot into either OS X or Windows. Boot Camp requires you to partition your disk, keeping one part for OS X and Windows in the other. Virtualisation solutions have the advantage that you can run both your OS X apps and Windows apps side-by-side, without having to reboot, and they can both share the same disk without repartitioning.
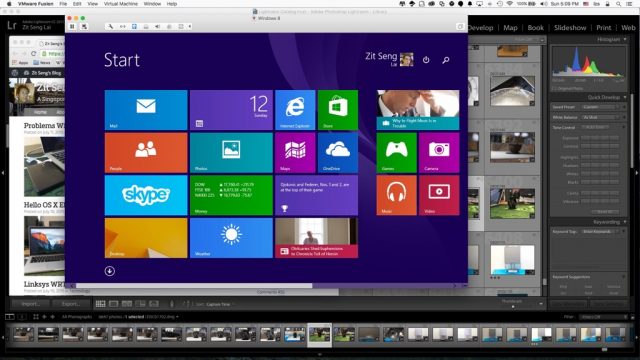
I’d recommend to go with virtualisation solutions like VMware. SoC users have access to the VMware Academic Program for education purposes, and with Windows available via Microsoft DreamSpark, this is probably the best direction to go.
An alternative to VMware is Parallels Desktop. They do have academic discounts which work here.
Office Suite
Apple’s iWork office suite is free for newer Macs. It comprises Pages, Keynote, and Numbers, the equivalent of Word, PowerPoint, and Excel in Microsoft Office. iWork will read and write Microsoft Office files just fine. Mostly. There are also other free alternatives available, including OpenOffice and cloud alternatives like those from Google.
However, if you want to keep your sanity, I’d suggest to get Microsoft Office. I know free is nice, but getting productive work done is probably more important. At some point in school, you will have to work on group assignments, projects, or what not, and being able to share documents and presentations, passing the files back and forth through rounds of edits, are probably going to be routine. You will, at best, waste a whole lot of precious time plodding through interoperability issues, fixing up formatting, etc, if you use anything other than the real deal.
You can either run Microsoft Office in Windows, using one of the options discussed earlier to run Windows, or simply use the OS X native version of Microsoft Office. Office 2016 for Mac is now available to Office 365 subscribers. Office 365 University edition is surprisingly affordable, costing just S$108 for four years of subscription.
Wrap Up
For those looking to do some programming on the Mac, or getting comfortable with a Unix shell and command line interface, OS X offers plenty of great opportunities. I wrote a post on Prepping Your Mac for Programming three years ago, but is still pretty much still relevant today.
The Mac is pretty commonplace in NUS. It’s quite easy to get support, not just from IT Care, but also from fellow Mac users on campus.
PS: This is a 2015 update of my original 2012 article and other miscellaneous pages such as Mac @ NUS. If you’re looking to get a Mac, check out my earlier post on NUS Mac Notebook 2015 for commentary on the purchase through NUS.
PS: An edit of this article also appears in techn’us.
1 thought on “Using A Mac In NUS 2015”
View Comment Policy