I use IPv6 everywhere I can, not just on my websites, but also on my home broadband. So when I recently got a new MikroTik router to replace my pfSense gateway, one of the tasks I had to do was to configure IPv6 on it.
I am not unfamiliar with MikroTik, but my previous MikroTik hAP ac was used primarily as a wired and wireless bridging device behind my pfSense gateway. In that setup, the MIkroTik didn’t actually need any IPv6 configuration of its own. MikroTik doesn’t quite have a UI that is consumer friendly, so it’s not anything like you’d expect from a consumer router like D-Link or Linksys, and not even anything like pfSense.
The instructions in this mini tutorial is reasonably generic, as my broadband provider, StarHub, doesn’t do anything weird on their network. Hence, this tutorial may also be useful to other broadband networks.
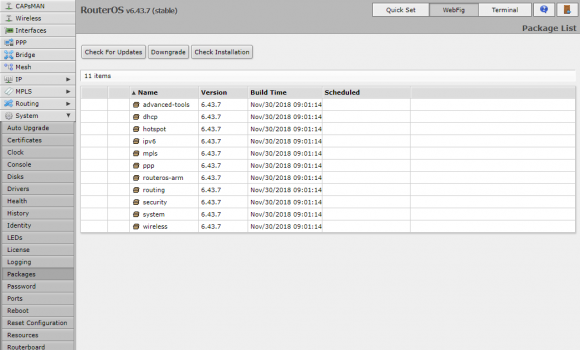
The first thing to do is to make sure that you have the IPv6 package enabled. It’s likely that you’ll find this disabled by default out of the box. Go to System, Packages, then click on the IPv6 entry in the table, click enable, Close, then reboot.
You should see an entry for IPv6 on the left navigation menu now.
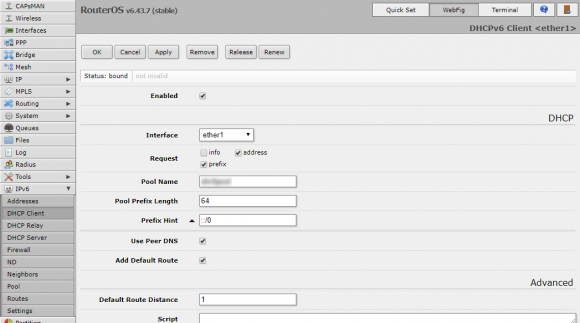
The next step is to configure the MikroTik router to use a DHCPv6 client to receive an IPv6 prefix delegation from the ISP. Go the IPv6, DHCP Client, and Add New. Setup the new DHCP client entry as follows:
- Interface: Set to your WAN interface.
- Request: Check address and prefix.
- Pool Name: Give it a unique name, which you’ll need to use later.
- Pool Prefix Length: 64 is usually correct.
- Use Peer DNS: Check.
- Add Default Route: Check.
Click OK. Wait a few moments, and check that your router should now receive an IPv6 address as well as a IPv6 delegated prefix.
Next, you’ll need a global IPv6 address configured on your LAN interface. In my case, I will use bridge1 as my primary LAN. Go to IPv6, Addresses, and click on Add New.
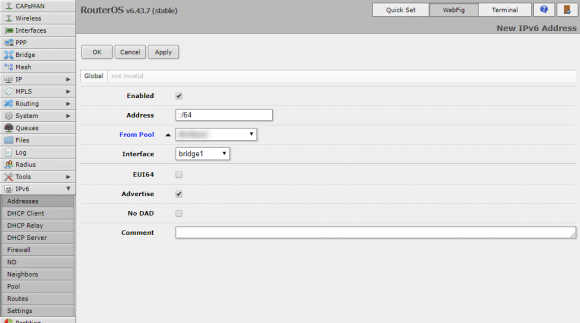
Configure the address as follows:
- Enabled: Check.
- Address: Set to ::1/64
- From Pool: Use the pool name you had created earlier.
- Interface: Specify your LAN.
- Advertise: Check.
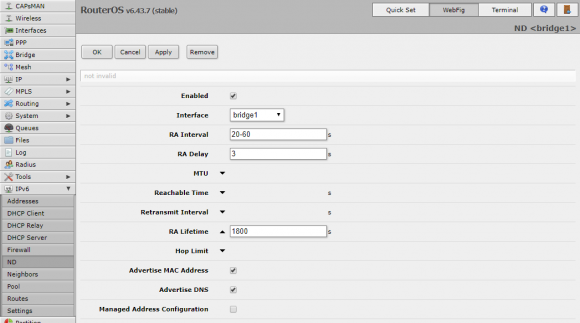
The final step involves configuring Route Advertisements. Go to IPv6, ND, and click Add New. Configure the entry as follows:
- Enabled: Check.
- Interface: Select your LAN.
- RA Lifetime: Set a reasonable time, like 1800 seconds.
- Advertise MAC Address: Check.
- Advertise DNS: Check.
- Managed Address Configuration: Uncheck.
- Other Configuration: Unheck.
Your LAN clients should now receive a global IPv6 address, and have a default IPv6 route to your MikroTik LAN interface. On a Linux box, the following commands will show that:
ifconfig -anetstat -64n
This is the setup that works for me on StarHub fibre broadband network. StarHub uses DHCPv6 for address and prefix allocation. If your WAN provider does the same thing, then the steps here should work for you.
Hi, very good article for the setting up of IPv6. Thanks.
One question is do we need to set up the firewall for IPv6?
My understanding is all devices are now accessible from the public internet without a proper firewall for IPv6?
Yes, all the home devices are now accessible from the Internet, so firewall is definitely required.
Thank you for your reply, Zit Seng.
Just thought it would be perfect if you could add some steps about basic ipv6 firewall settings in this article, or maybe a link to another guide.
Hi, do you know the Asus RT-AX router IPv6 setup for StarHub? Greatly appreciates if you could share your experience. I’m currently using RT-AX1800HP. Many thanks.
Not familiar with settings for this router specifically. The network config ought to be via DHCP.
Noted and thanks for your reply.