Happy new year 2023! Many people seem to share about their desk setups, so I thought I’d also do that for this first post of 2023. It’s going to be a little bit more that what I have setup, but also the thoughts about how they came to be, or I wish they would be.
To be honest, there’s nothing fancy about my desk setup. That’s probably why I’ve never ever posted about it before. It would seem a bit strange to write about something so ordinary. Notably, I don’t have a standing desk, something that seems to be the rage nowadays. I’m going to say a little about these desks later.
There’s so much that goes into choosing the various bits in a desk setup. I wished I had known them before going with some choices that I would later regret. Let me start with the most fundamental bit: the desk itself.
For the longest time, I’ve been wondering why I somehow just don’t feel so comfortable working at home as I do in the office. It isn’t about the aircon in the office (or the lack of at home), though of course having aircon certainly helps. It was something about the sitting posture at the desk that was different in the office. I eventually figured out that there was something about the desk and chair that made a great difference to me.
First, I like to sit close to the table edge, i.e. chair is near enough to the table that the arm rest needs to get under the table. See what I mean in the photo below.
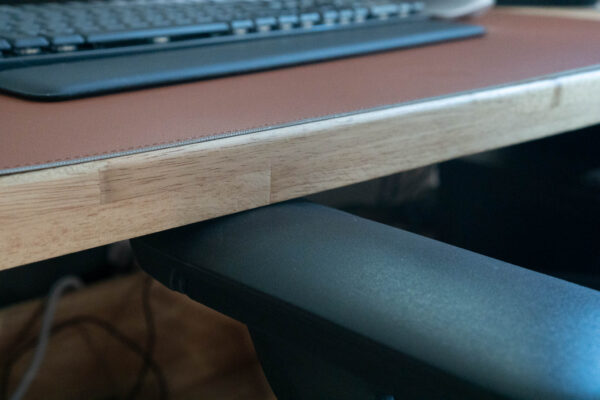
The problem with my old desk is that it had a drawer, and it prevented the chair from moving in. Of course, if the chair didn’t have an arm rest, the problem wouldn’t exist. But I like the arm rest.
The way I sit and type, I like my elbows supported by the arm rest. This requires that the arm rest be as level as possible with the table surface. Of course, it can’t be exactly level, since it has to get under the tabletop and the tabletop has some thickness. Thus, it is necessary that the tabletop be thin. This table I have, unfortunately, has a skirting all around so that the edges are thicker (1.25-inches) compared with the actual tabletop (0.65-inches).
The desk needs to have some depth, especially if like me, you want to sit close to the edge of the desk. This is because the keyboard has to be somewhere more in the middle of the table, not at the front edge. Mine is 600 mm deep, which I think is just barely enough. It’s actually not enough considering the space required for the monitor arm to manoeuvre, if you are using one. You can cheat by pulling the table away from the wall a little, but in which case, don’t forget to take that into account when planning the space in the room.
For table width, I suggest not less than 1200 mm wide for a two-monitor setup. More, if you need other stuff on the desk, or prefer to have more space.
Why didn’t I use a standing desk? Back then, standing desks were expensive, so I settled on this much more affordable table. There are many more standing desks in the market now, many with sub-$500 prices that you can get locally. However, I am still undecided if a standing desk is really something worthwhile to spend on.
You see, this idea of sitting and standing is supposed to improve overall wellness. But I ask myself, would I stand to work at my desk? I know I don’t sit around in my chair all day. I do get up, I walk around, go to the kitchen to get a drink, do some stuff around the house, and then come back to the desk. I don’t foresee that I would do much standing at my desk to work. The idea of having the flexibility is nice, and maybe with prices dropping, the price could be justifiable. So maybe I would consider it when, for some reason, this present desk somehow breaks, and a replacement is required.
Do note that standing desks do have some limitations that you may want to consider. Cables to the wall or to other things not on or attached to the desk will be something you need to manage. Most standing desks also don’t come with under-desk storage shelves, if that’s something you need. (I like to have them.)
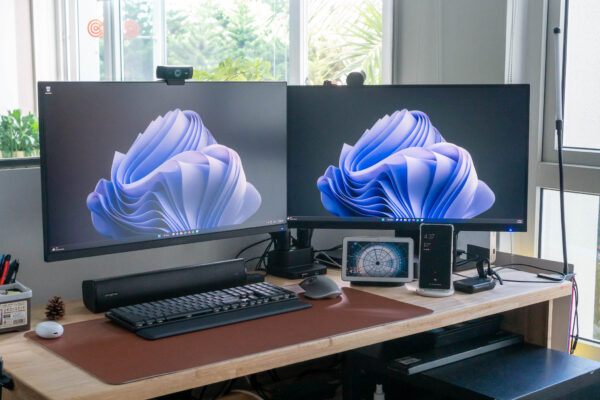
My main computer is a dual-monitor Windows PC setup. It would have been nice to have two identical monitors, but alas, I have two different ones. In fact, they are in slightly different sizes. The main one on the left is a 28-inch 4K monitor from PRISM+, while the right one is a 27-inch 4K monitor from SuperSolid. The SuperSolid brand has been around pretty long, and they came to market around the same time as PRISM+ did.
Having two identical or near-identical monitor makes them easier to work with more seamlessly. Screen objects that are meant to be the same size will actually look the same size on both monitors. Dragging items across from one monitor to the other would not have abrupt visual changes.
My two monitors are supported by the PRISM+ Arc Stealth Dual monitor arms. Monitor arms are an absolutely amazing solution to freeing up space on your desk. Don’t underestimate the amount of space wasted by the conventional monitor stands. They take up precious space and limit your flexibility with where you can put them, and also how your monitor gets positioned.
This PRISM+ monitor arm is very robust and well-built. It can either be clamped on at the table edge, or through a gromet hole. I was a little worried that the gromet clamp may leave some table damage, so I got a monitor mount reinforcement plate for the clamp to grip onto on the underside of the table. A nice thing about this arm is that the screw to the clamp is access from the top, so you don’t need to get under the table to install it. The monitor mount is one with a quick-release design, so installing and removing monitors is a piece of cake.
My monitor arms did need some rear clearance to position my monitors exactly as I would like them. This is really hard to tell in advance. I ended up having to move my table out about 10 cm from the wall.
My main computer is a tiny little Intel NUC 11 Performance Kit. This is basically a laptop-class hardware, except that it doesn’t have a battery (or screen or keyboard or touchpad). It saves space and is easy to fit anywhere. There’s even a VESA mount kit for attaching behind a monitor if you so want.
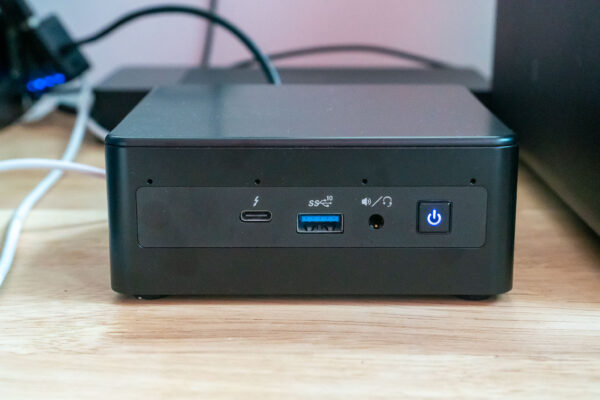
Before getting this Intel NUC 11, I had been mainly using a laptop computer connected to a dock as my “desktop computer”. I didn’t need much compute power for the things I do, so this was mostly a fine arrangement. Except that, I was concerned about long-term damage to the laptop’s battery. It would be powered by AC all the time when I’m at the desk. The heat and long-term use may have a detrimental effect on the laptop.
The Intel NUC 11 was a neat solution. It’s easy to take this PC around if I ever needed to do that.
I mentioned a dock. I had it because I was previously plugging in a laptop, and it was really inconvenient if I had to connect a power cable, multiple display cables, Ethernet cable, audio cable, USB gadgets, and other paraphernalia. I wanted a single connection to the laptop that would replace all those myriad cables, and I will learn, docking is a far more complicated thing that I expected it to be. Let me just warn you, if you are thinking about a docking setup, that you will need to do plenty of research. This is not plug-and-play.
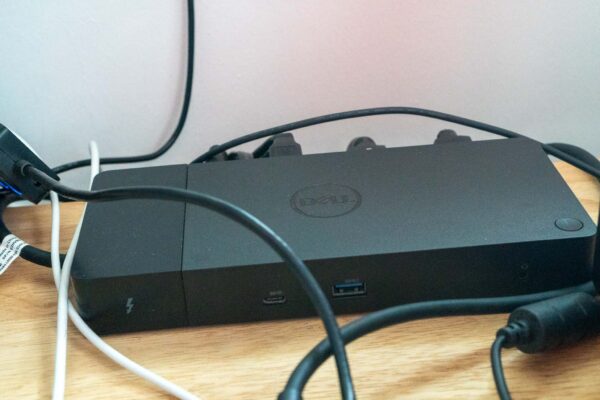
The docking solution I eventually settled on is the Dell WD19TB Thunderbolt 3 Dock. It’s a very capable dock, capable of supporting 2x 4K @ 60 fps like I have, or triple displays with 1x 4K @ 60 fps and 2x QHD @ 60 fps, or quad displays with 4x QHD @ 60 fps. There are still a variety of cable and port restrictions to take note of, so, as I said, be prepared to do some research.
I still use this dock even with the Intel NUC 11 since if I ever need to switch “everything” over to a laptop, I’ll only need to move one cable.
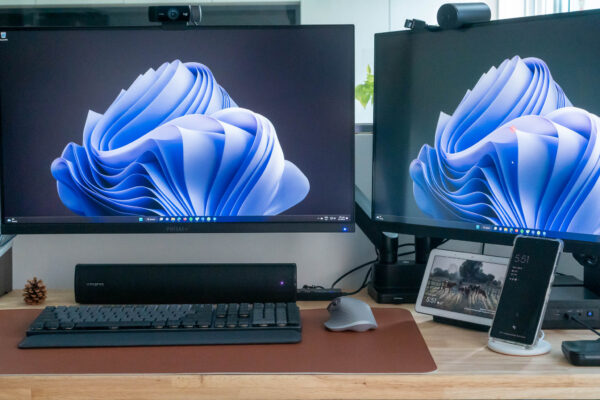
You know the one thing I missed when I moved from using a laptop directly to a desktop PC? It’s Windows Hello authentication. So, I made sure I got one of those USB fingerprint readers. I have it attached to the ARC Stealth Dual ports.
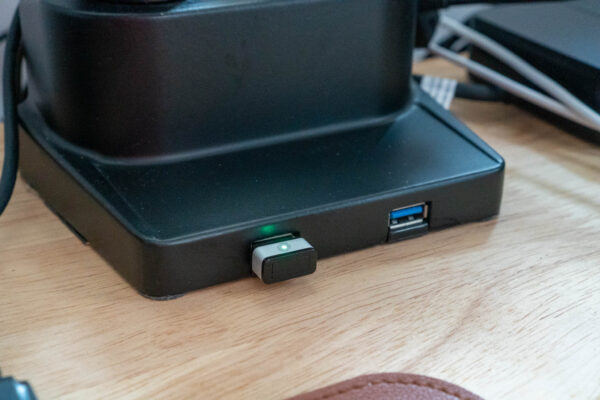
This fingerprint reader is so useful that I also got another one to use in the office. It was quite cheap when I bought them, and I’m surprised to see all the available options seem somewhat more costly nowadays.
My keyboard and mouse are both wireless. They are the legendary Logitech MX Master series gadgets: MX Mechanical Keyboard and MX Master 3 Mouse. The MX Mechanical Keyboard is about as awesome as the MX Keys Advanced and it took me a very long time to decide if I thought they were truly equals. Well, it’s been a while, and I’ve decided I like the MX Keys Advanced more. I don’t particularly fancy mechanical keys, or maybe, I should say, I’m mostly indifferent to them. These are the best keyboard and mouse in my books.
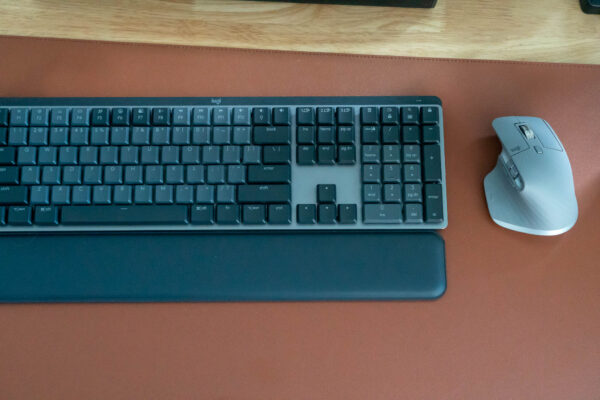
But if you fancy mechanical keys, I reckon the MX Mechanical Keyboard may be a preferred choice over the MX Keys Advanced.
Although these devices support Bluetooth wireless connectivity, I have them connected via Logitech’s Unifying Receiver (for the MX Master 3) and Bolt receiver (for the MX Mechanical Keyboard). I’m annoyed at Logitech’s move from Unifying to Bolt, thus now necessitating an extra dongle connection.
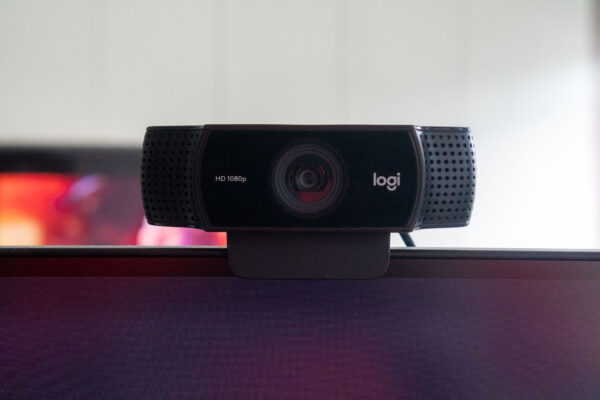
For my online meetings, I mainly use a Logitech C922 webcam and Plantronics Voyager 5200 headset (similar to the Voyager Legend).
The Plantronics headset supports Bluetooth, but as it were with docking stations, I was utterly surprised that Bluetooth headsets are more complicated that I thought they would be.
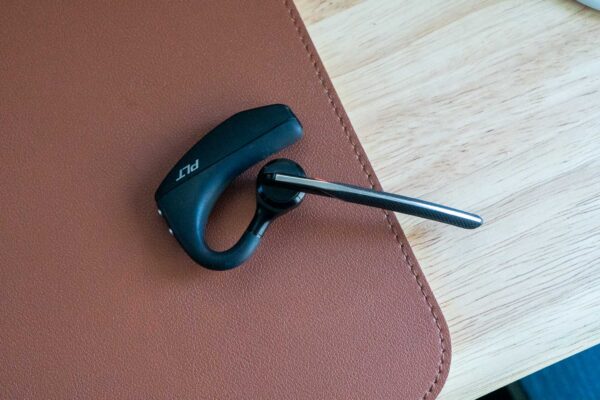
The problem was with supporting a physical mute button on the headset that will actually work to mute the microphone. In addition, the mute status should preferably be reflected in the PC and various apps such as Zoom and Microsoft Teams. This means, for example, that when I mute the headset using its physical button, then Zoom should reflect that my mic is muted.
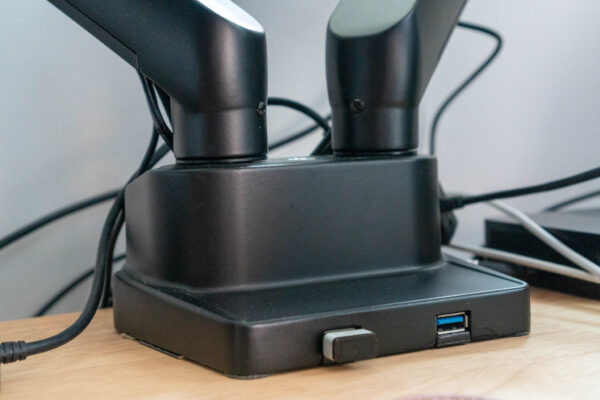
I thought a physical mute button was simple and straight forward. This works on smartphones without problems but apparently isn’t the same with PCs. I tested other Bluetooth headsets. I even tried a random Bluetooth headset from Amazon that specifically listed “physical mute button” as one of its feature highlights. They did not work. The Plantronics Voyager 5200 needed the BT600 dongle for mute to work in a sensible way. Hence, another dongle got added to my setup.
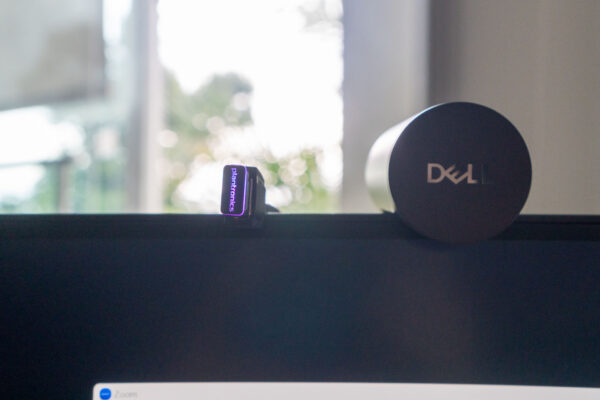
I made the best of the BT600 dongle. Using an extension cable, I elevated the BT600 dongle so that it is positioned over the top of my monitor. This serves two purposes. Firstly, the dongle has a status light that shows mute status. So, it is very easy for me to see if my mic is muted. No need any more to scan my screen to check my mic status. The other benefit is that this dongle becomes like an antenna, improving the wireless performance, enabling me to walk all around the house while having my meetings. I can go to the kitchen to get drinks and snacks, or to the main door to get my deliveries. I love this mobility. It’s the best way to have online meetings while WFH.
Eventually, I hope to fix this dongle somewhere that it will look nicer. I really like this Plantronics setup.
You may notice a second Dell Pro Webcam in my photo. That’s a secondary camera. It is very good, though as you can imagine, not often used.
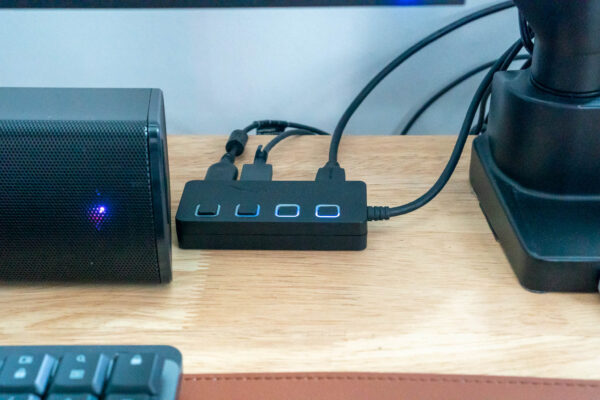
Now, for the paranoid people who worry that their webcams get unintentionally activated, I address that concern with a physical USB button. You see that USB hub in the photo above? Yes, just turn on the port only when the webcam is required. When off, the webcam is physically disconnected from the PC. No way to be accidentally (or otherwise) turned on.
For speakers, I presently use the Creative Stage Air V2. Sigh. Speakers has been a headache too. Ideally, I want a soundbar that is USB powered, preferably audio over USB. I want it to turn on automatically once the PC is turned on. Is it so difficult? I found some cheap ones on Amazon but returned them because the sound quality was so horrendous. I’m not expecting anything near audiophile performance, but these were bad. As bad as monitor speakers.
I tried the Creative Pebble v2, and while not a soundbar, it did turn on (the mechanical switch can be simply left on) when the PC turns on, and it sounded good. But it was a tad clunky and, well, I preferred a soundbar.
The problem with the Creative Stage Air V2 is that once the PC turns off, the soundbar goes into Bluetooth pairing mode, then after not finding anyone to pair, it eventually turns off. When the PC turns off, the soundbar begins to be self-powered from its own batteries. I totally didn’t need the batteries but that’s what it had, and I don’t know if the batteries will die prematurely, and if the soundbar will work with non-functioning batteries. When I later turn on my PC the next day, I’ll need to also turn on the soundbar. Don’t mind my nitpicking but having the press the power button on the side for 2 seconds or so is a chore that should not need to exist. I don’t know a better, affordable, solution for now, so the Creative Stage Air V2 is what I use.
That’s pretty much the computer part of the desk. But yeah, my desk is a bit more complicated. Hidden behind the secondary monitor is a bunch of stuff. I’ve already mentioned the Dell dock and the Intel NUC 11. The other box here is a QNAP TS-464 NAS.
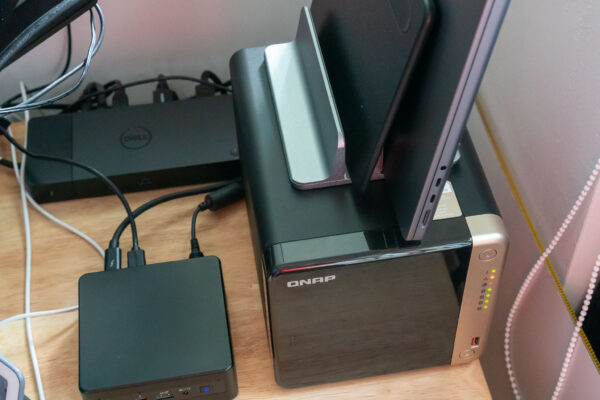
I have been running a PC server, using TrueNAS (previously called FreeNAS) and a few Linux VMs running in it. A couple of months ago I decided to try out this 4-bay QNAP NAS. The QNAP TS-464 seems pretty capable. It’s a bit less powerful than my old PC. But this cute little box seems like a good space saver, like the Intel NUC 11. I had hoped it would draw less power than my old PC, but it turns out to be not appreciably better, if at all, surprisingly. (I should rerun this test to understand the results better, because theoretically, the QNAP NAS really ought to be much less power hungry than the PC!)
I am also hoping that the QNAP NAS would be better supported as a complete appliance. TrueNAS had occassionally given me some hardware-support issues, and at work, I encountered more issues getting VMs to run reliably.
This QNAP NAS now holds all my data. I continue to run a few Ubuntu Linux VMs in the NAS. I moved from Nextcloud on TrueNAS to Qsync on QNAP, but now migrated to a docker-based Nextcloud running in Ubuntu Linux VM in QNAP. Story for another day.
On top of the QNAP NAS, you’ll see a laptop stand, with a MacBook Pro and a Wacom Intuos BT S tablet. I used to be a long time Mac user, then decided to move to Windows in 2018. I’m back to having a Mac laptop again. I’m trying to get used to the idea of using both: Mac for mobile use, Windows PC at the desk.
The Wacom tablet has been a very useful input accessory to me. I need to annotate documents, the kind that involves drawing, not simply adding text comments. I also find it tremendously useful during Zoom meetings to markup on screen shares. When I previously used a touchscreen pen-enabled laptop, I could simply write on the screen. On a desktop PC, however, a Wacom tablet will have to do. There are more expensive Wacom tablets that include a display so you can use like a laptop screen, but I settled on the much more affordable Intuos BT S.
When not in use, it gets stowed in the laptop stand. (I did at one time use more than one laptop actively, hence the two-slot laptop stand.)
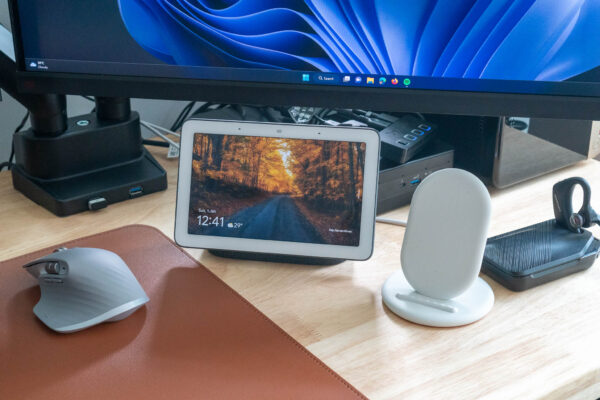
In front of my secondary monitor, stands a Google Nest Hub and a Pixel Stand.
I have several Nest Speakers and Nest Hubs around the house, so this Nest Hub is just the one for the study room. Originally, I thought the Nest Hub’s extra screen would be useful, such as enabling me to watch YouTube videos without taking up screen space on my desktop monitors. I rarely do that. But a display, nevertheless, does look cool. Though not visible in here, I have a Wi-Fi plug setup to power on and off my Intel NUC 11, monitors and dock, and other smart controls for fans and lights in the room.
The Pixel Stand is where I charge my phones wirelessly. Behind the Pixel Stand you’ll see the carrying case for the Plantronics Voyager 5200, which also serves as a charging stand like you see it in the photo above. I also have a few loose USB Type-C cables around and at least one USB Type-B used for charging various things as well as occasional need for USB data connection (e.g. getting photos out of my camera).
The huge mouse mat, or desk mat, you see my keyboard and mouse on, is an inexpensive fake leather mat bought online (either Shopee or Lazada). I’ve been using huge mouse mat for ages, because I liked my mouse to have more space to roam around. This 80 x 40 cm mat is big enough.
I started this post with the desk. Let me finish it with the chair.

I think it will come as no surprise that if you sit long enough, the chair matters a lot. Yeah, you can stand and walk around but you eventually come back and want to sit. I have gotten some “wrong” chairs that seemed okay initially but eventually didn’t feel right after some extended use. Again, like the desk at office, I tried to figure out why my office chair (which is quite inexpensive) felt more comfortable, and I arrived at some answers.
One thing is about arm rest. The arm rest needs to support your arm/elbow comfortably, and it may need some adjustment, such as front/back, side, or rotational adjustments, to feel right. There’s also the matter of seat depth, i.e. the part that you sit on. This is related to having proper lumbar support, but seat depth is a thing of its own, and it should not be ignored.
Those were unexpected factors, at least to me. Things like seat height and proper back support are equally important. These are things that most people know about.
I do want to add one more thing. Make sure that the chair is a mesh type. Not fabric, not leather. In hot and humid Singapore weather, you need mesh so that you can keep cool. Unless you’re going to have aircon running.
That’s what I have for my desk going into 2023. There are some things that could be improved, but they are mostly good. I hope these give you plenty of ideas about how you can configure your own ideal desk setup.
View Comment Policy